| 일 | 월 | 화 | 수 | 목 | 금 | 토 |
|---|---|---|---|---|---|---|
| 1 | 2 | 3 | 4 | 5 | 6 | 7 |
| 8 | 9 | 10 | 11 | 12 | 13 | 14 |
| 15 | 16 | 17 | 18 | 19 | 20 | 21 |
| 22 | 23 | 24 | 25 | 26 | 27 | 28 |
- back-end
- java
- 상속
- props
- component
- kafka
- 코틀린
- swagger
- 개발이 취미인 사람
- Sequelize
- jpa
- 조건문
- javascript
- file upload
- front-end
- 반복문
- It
- restful api
- Kotlin
- 개발이취미인사람
- SWIFT
- 개발자
- state
- react
- AWS
- spring boot
- Producer
- Nest.js
- node.js
- vue
- Today
- Total
개발이 취미인 사람
[Swagger] Swagger Yaml 기본 파일 작성 본문
- 지난 시간
지난 시간에는 Swaager UI를 구축하는 시간을 가졌습니다. 혹시 구축하지 않으셨다면 아래 링크를 보고 구축하고 오시면 되겠습니다.
[Swagger] Swagger UI를 활용한 내부 API Client 구축
- 개요 안녕하세요. 이번 글에서는 Swagger UI를 활용한 API 문서화 및 Client 서버 구축에 대해서 알아보겠습니다. 일단 Swagger라는 기술은 API를 설계하고 문서화를 해주는데 도움을 주는 기술입니다.
any-ting.tistory.com
- 개요
이번 시간에는 yaml 기본 파일 작성법에 대해서 알아보고 클라이언트 UI를 만들어 보도록 하겠습니다.
Swagger를 사용하면서 가장 좋은 장점은 RESTful API를 문서로 작성할 수 있고, 클라이언트 개발자와 서버 개발자가 협업하는데 도움을 준다는 점이라고 생각이 듭니다.
그리고 회사 내부 시스템에 구축이 가능해서 외부에 노출 위험을 줄일 수 있다는 점도 하나의 장점이라고 생각이 듭니다.
실제 회사에서는 데이터 하나하나 문서 하나하나가 기밀일 수밖에 없습니다. 이러한 부분을 보안할 수 있다면 정말 좋겠죠?!
- 작성법
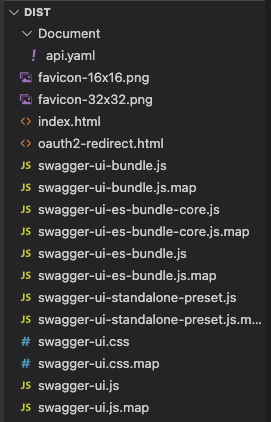
저희가 다운로드 받은 dist 폴더 index.html 파일을 먼저 확인하겠습니다.
<!-- HTML for static distribution bundle build -->
<!DOCTYPE html>
<html lang="en">

<head>
  <meta charset="UTF-8">
  <title>Swagger UI</title>
  <link rel="stylesheet" type="text/css" href="./swagger-ui.css">
  <link rel="icon" type="image/png" href="./favicon-32x32.png" sizes="32x32" />
  <link rel="icon" type="image/png" href="./favicon-16x16.png" sizes="16x16" />
  <style>
    html {
      box-sizing: border-box;
      overflow: -moz-scrollbars-vertical;
      overflow-y: scroll;
    }

    *,
    *:before,
    *:after {
      box-sizing: inherit;
    }

    body {
      margin: 0;
      background: #fafafa;
    }
  </style>
</head>

<body>
  <div id="swagger-ui"></div>

  <script src="./swagger-ui-bundle.js" charset="UTF-8"> </script>
  <script src="./swagger-ui-standalone-preset.js" charset="UTF-8"> </script>
  <script>
    window.onload = function () {
      // Begin Swagger UI call region
      const ui = SwaggerUIBundle({
        url: "https://petstore.swagger.io/v2/swagger.json",
        dom_id: '#swagger-ui',
        deepLinking: true,
        presets: [
          SwaggerUIBundle.presets.apis,
          SwaggerUIStandalonePreset
        ],
        plugins: [
          SwaggerUIBundle.plugins.DownloadUrl
        ],
        layout: "StandaloneLayout"
      })
      // End Swagger UI call region

      window.ui = ui
    }
  </script>
</body>

</html>
엄청나게 복잡하죠... 하지만 걱정 마세요 :) 저희가 수정해야 할 부분은 url: "https://petstore.swagger.io/v2/wagger.json"입니다.
저희가 앞으로 작성할 파일을 url을 통해서 연결을 하면 됩니다.
IED를 사용해서 dist 폴더를 실행시켜줍니다. 그리고 Document 폴더를 생성한 후 그 안에 api.yaml이라는 파일을 만들겠습니다.
index.html 파일을 열어 url 경로를 수정해 줍니다.
url: "/Document/api.yaml" 변경
변경하면 아래와 같은 화면이 보 여실 겁니다. 아직 저희가 yaml 파일을 작성하지 않아서 저런 모습입니다.

yaml 파일을 작성하면서 RESTful API UI를 만들어 보겠습니다.
- 기본 구조
openapi: 3.0.0
info:
  version: '1.0.0'
  title: '개발이 취미인 남자'
  description: '프로젝트 설명 RestFul Api 클라이언트 UI 로컬 서버를 구동 후 요청해주세요.'

#내가 요청하고 싶은 서버 url 설정 다수로 설정가능
servers:
- description: "프로젝트 Dev Server"
  url: http://localhost:4000/api
- description: "프로젝트 production Server"
  url: http://localhost:7777/api

# API 요청 경로 및 데이터 세팅
paths:
  /:
    get:
      summary: "Get 방식(1)"
      description: "서버에 아무 데이터 업이 Get방식으로 요청"
      tags:
        - Get 방식
      responses:
        '200':
          description: 서버에게 받은 결과 값
          content:
            application/json:
              schema:
                type: object
                properties:
                  ok:
                    type: boolean
위 yaml 파일은 제가 작성했습니다. 간단하게 설명하겠습니다.
보통 openapi 와 swagger 2.0 두 가지를 사용하실 수 있습니다. 저는 openapi를 활용해서 작성했습니다. (필수 작성!!)
openapi: 3.0.0
문서 정보를 작성
info:
version: "문서 버전"
title: "문서 제목"
description: "프로젝트 세부 내용"
Servers에는 항목을 여러 항목을 작성할 수 있습니다.
servers:
- description: "세부 내용 작성"
url : "요청 보내고 싶은 서버 주소"
RESTful API Method 작성
paths:
/: 경로
get: "API Method"
summary: "소제목"
description: "세부 내용 작성"
tags:
- 카테고리 항목 설정 (로그인, 매물, 장바구니... 등등)
responses: "서버에게 받을 결과 값 설명문"
'200':
description: "세부 내용 작성"
content:
application/json: "content type"
schema:
type: object "객체(JSON) 형태로 받겠다."
properties:
ok:
type: boolean
그럼 작성한 결과물을 브라우저를 통해 확인해보겠습니다.
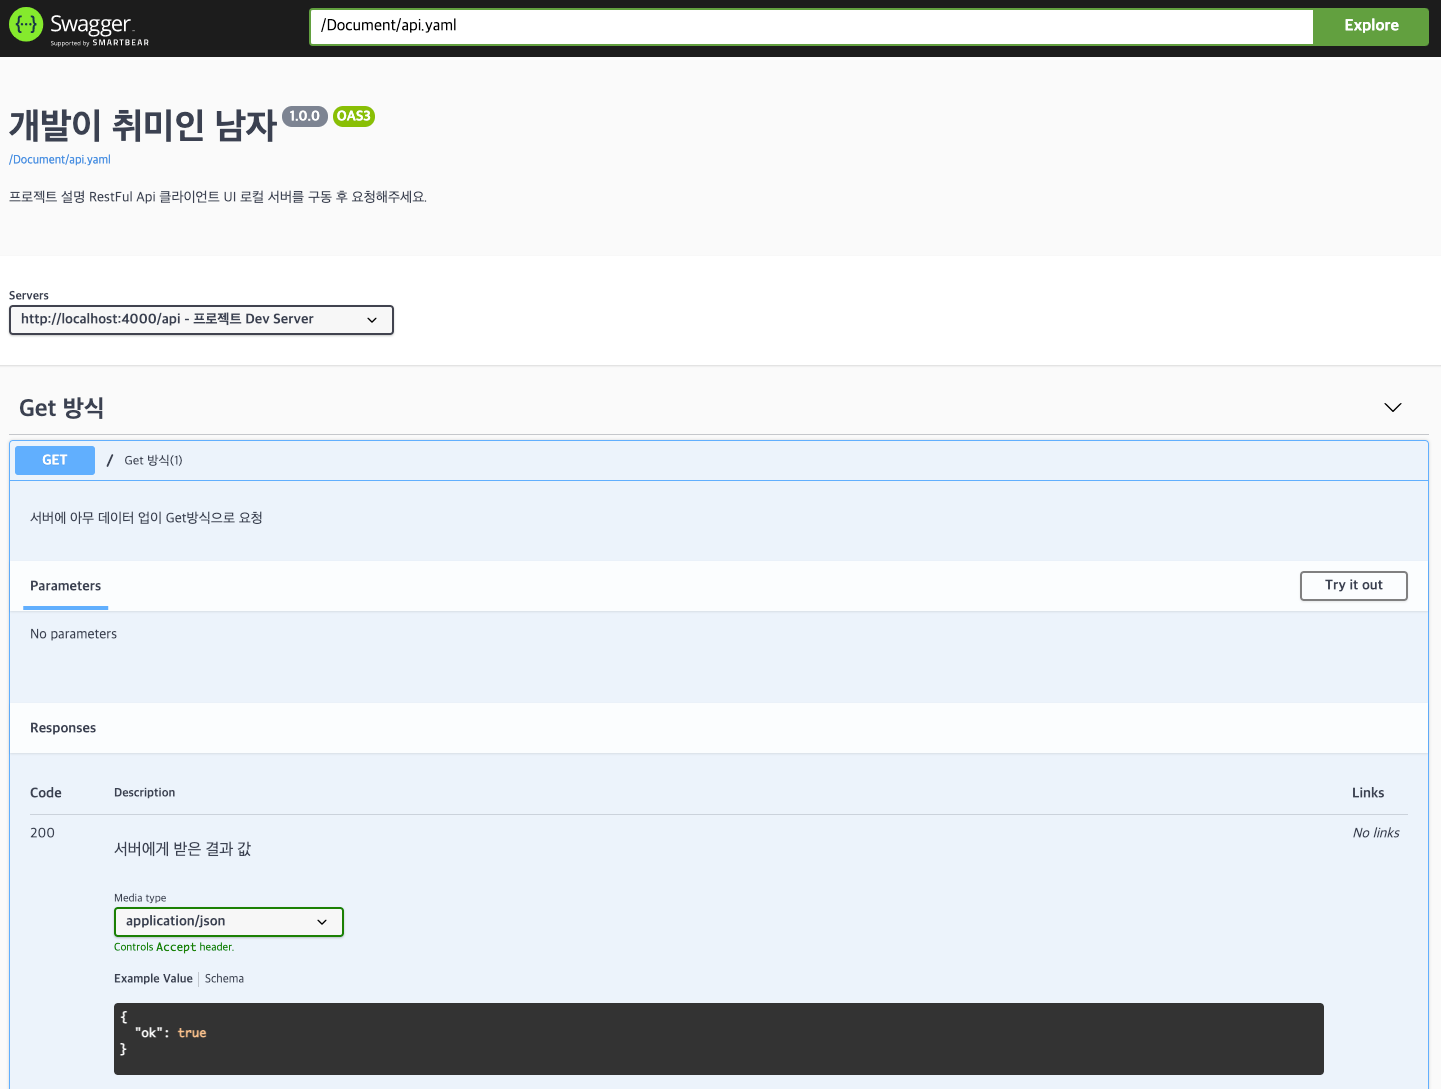
이렇게 저희는 GET 방식으로 요청 가능한 RESTFul API를 작성했습니다.
다음 시간에는 다양한 RESTFul API를 만들어 보도록 하겠습니다.
소스 저장소
- GitHub : github.com/Ryan-Sin/Swagger-UI
Ryan-Sin/Swagger-UI
Contribute to Ryan-Sin/Swagger-UI development by creating an account on GitHub.
github.com
참고 사이트
- 공식 홈페이지 : swagger.io/docs/specification/about/
About Swagger Specification | Documentation | Swagger
What Is OpenAPI? OpenAPI Specification (formerly Swagger Specification) is an API description format for REST APIs. An OpenAPI file allows you to describe your entire API, including: Available endpoints (/users) and operations on each endpoint (GET /users,
swagger.io
'백앤드(Back-End) > Swagger' 카테고리의 다른 글
| [Swagger] Node.js Swagger API 문서화 (0) | 2021.10.04 |
|---|---|
| [Swagger] Swagger Yaml 파일 RESTFul API 클라이언트 구축 (0) | 2021.01.28 |
| [Swagger] Swagger UI를 활용한 내부 API Client 구축 (0) | 2021.01.11 |


